Getting started with RT-Thread on the CH32V307
I just received a WCH CH32V307 RISC-V development board as part of the Hack It! RISC-V Design Challenge. What follows is a simple tutorial in getting started with running an RT-Thread example on the CH32V307 development board.
Installing and setting up the IDE
- Download MounRiver Studio and install it.
- Download or
git clonethe OpenWCH CH32V7307 repo. - Load the RT-Thread project at
ch32v307/EVT/EXAM/RT-thread/rt-threadinto MounRiver Studio.
Setting up the debugger
- Go to Run –> Debug Configurations..
- Select GDB OpenOCD WCH Debugging / rt-thread.elf
- Click on the Debugger tab
- Enter the following under Config options:
-f wch-riscv.cfg - Click Apply and then Debug

Running the example
- Plug your development board into USB port P9
- Make sure the project is selected in the left-hand pane
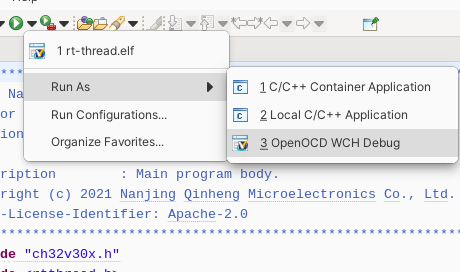
- Click the arrow to the right of the Run button, and select Run As –> OpenOCD WCH Debug:
If all goes well, it should build and and start running the example. If not, you may need to click Project-> Rebuild. Now, open up rt-thread/user/main.c in the project, and you'll see that it is supposed to flash an LED and print to the terminal. Now you may wonder: “Why am I not seeing LED1 flashing on the board?” I wondered this too, and found this in the CH32V307 evaluation board manual:
- LED: Controlled by connecting the extension connector J3 to the IO port of the master MCU
What this actually means is that you need a jumper cable to connect pin LED1, which is on the extension connector J3, to pin PA0, which is on both the extension connector and the Arduino interface. If you wire this up correctly, you'll hopefully see the LED blinking:

If you also want to see the RT-Thread terminal, just connect to the board using your favourite serial terminal at 115200 bps, e.g. using minicom:
minicom -b 115200 -D /dev/ttyACM0

You don't need a separate USB-serial adapter, as the serial interface is provided by the WC-Link onboard the development board.
Any feedback and comments are appreciated!
#riscv #wch #electronics #ch32v307 #rtthread
Comment on this post