How I use Todoist to get stuff done
This guide will help you figure out Todoist and get started in 20 minutes. It's a walkthrough of how I personally use the app to manage my life and keep the stress levels at bay.
Todoist helps me declutter my mind by telling me what I need to do and when. With that taken care of, I'm free to focus my brain cells on solving higher-level creative challenges. The app hands me a few high-value tasks daily that I can flow in and out of without feeling rushed or uncertain. I like knowing that if I get these few things done, I'll make myself and others happy, and eventually, it could lead to a life well-lived. Taxes will get paid; important mail won't go missing; my marriage will flourish; family and friends won't feel neglected; the future will look after itself; expectations from work will get exceeded; soul-crushing work will get avoided. You get the idea.
How can you win the time war without feeling overrun and still do the things that matter to you? You might find some answers in the surprisingly simple nine steps below.
My Todoist playbook
Keep in mind this is one of many ways to use Todoist. I personally like this method because it's dead simple yet effective; it's easy to get started and customize as you figure things out.
Step 0: Sign-up for Todoist
If you haven't already, head over to Todoist and sign-up. Starting with their free option, I recommend using your personal Gmail account to create an account. It makes everything much easier later on. Todoist syncs across all your devices. They have a desktop app, a browser version, and a mobile app. I recommend using the browser version when you're on your laptop and the mobile app for your iPhone or Android. The mobile app is a must.
Tip: I also recommend Todoist's Chrome extension for even quicker access from your laptop browser.
Step 1: Create your first four projects
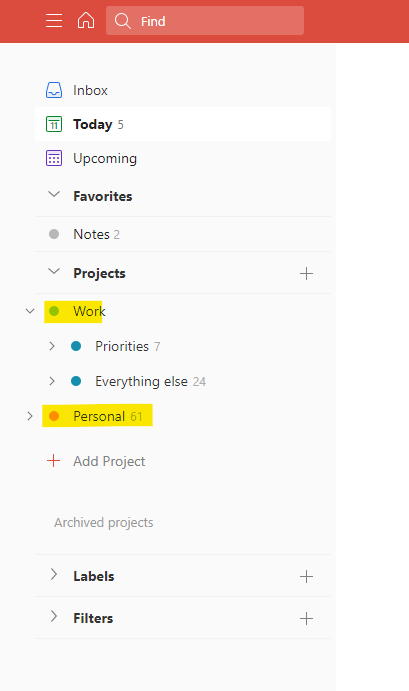
First, create your two top-level projects: 1) Work and 2) Personal. And, create two sub-projects under Work: A) Priorities and B) Everything else.
Step 2: Enter your Work priorities next

Enter each work priority as a sub-project to your Priorities project. Rank them in order, so you never lose sight of their relative importance. I set my work priorities quarterly, so this rank ordering reflects my plan for the quarter.
Step 3: Everything else

Create the sub-projects under 'Everything else' as shown in the image above. The 'Everything else' project is critical because it helps you protect your priorities. I'll show you how later.
For now, here's what will eventually live in each sub-project as per the image above...
One-off: All the requests you get from other people that do not align with your priorities. To further illustrate, it could be as simple as 'Write birthday greeting for co-worker Shelly.' Or, it could be 'Distribute new performance framework to the team.' Or, 'Send article to the Sales team.'
Agendas: This is one of my favorite folders. I've created sub-projects for each of my regular stakeholders.

Agendas (in no particular order)
Each time an idea pops up that I need to cover in our next 1:1, it goes in their respective project (or folder, same thing). Get it out of your head and into Todoist asap.
Reference: The things I may need to reference again and again, pretty self-explanatory. It could be an email, links, or notes. Yes, Todoist has a few simple ways to integrate with your email, and you can send links to your Todoist (more on that in later steps).
Notes: (Less important) I often have Todoist open while I'm in a meeting to keep my notes all in one place. When needed, here's where they go.
Backlog: Every time I say or think, “that's a good idea but not now,” about an idea, it goes in this project. Super handy when I start planning for next quarter. We used to have a saying at LinkedIn: always be planning!
Step 4: Add Personal sub-projects
Here's how I've set up my Personal projects...

You'll notice that 'Groceries' has a different icon next to it; that's because it's a shared project with Myriam.
Now the fun starts...
Step 5: Got a to-do? Throw it in your Inbox

Each time you get hit with a new task of any kind, press 'Q' anywhere in Todoist in your browser or hit the '+' icon on the phone app, type in what you need to do, and hit Enter. You can worry about it later, but at least it's out of your head.
Step 6: Add emails as tasks
Sometimes, emails are actually tasks. Say the email triggered by your co-worker who tagged you in a Google Doc is cluttering your email inbox, or you're worried that you'll eventually forget about it. Unless it needs attention in the next 5 minutes, send that email to Todoist and worry about it later.
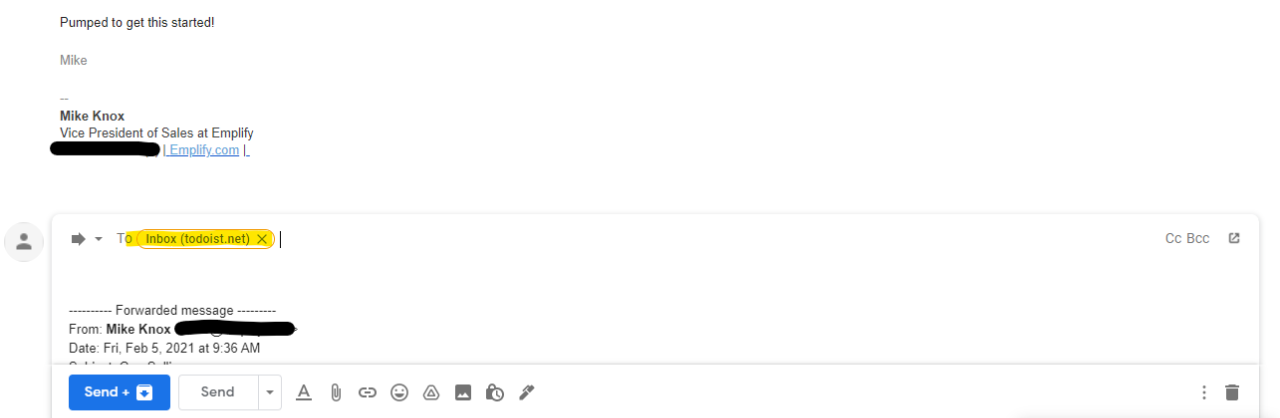
Here's how to get your Todoist Inbox email address: Click the overflow menu (three dots) in your Inbox as shown in the image below.

Grab your special Inbox email address and add it to your email address book. The next time you need it, start typing 'Inbox' in your email 'To:' field, and it will auto-populate. Now, you can forward any email that's actually a task to Todoist.
When you forward an email to Todoist as a task, the email's contents are added as a comment attached to the task.
Tip: Don't forget to add or send all your tasks to Todoist as they come up. Otherwise, none of this will work. Believe it or not, it takes practice!
Step 7: Pick a project and assign a due date for each task in your inbox
At the end of your day, your inbox may look something like this:

A list of tasks that you've added throughout the day.
Before wrapping up your day, click each task and decide which 'Work' or 'Personal' project should belong to and when it should get done.

Clicking a task will bring up this modal where you can pick a date and project, and do much more.
Note: I use 'due dates' in Todoist as the date I plan to work on a particular task, not when it's actually due. When needed, I'll often type the actual due date in brackets in the task title. For example: if I plan to work on a task on 2/18, but that task is due on 3/1, I'll type it in as “(Due 3/1) First draft of case study,” and I'll pick 2/18 as the date in Todoist.
Once you assign a project to each task, it will disappear from your Todoist Inbox and be transferred to that particular project.
Here comes the best part...
Step 8: Start each day knowing exactly what you need to work on
Click 'Today' from the left sidebar, and you'll see all the tasks you've scheduled for today. Time to crank it out!
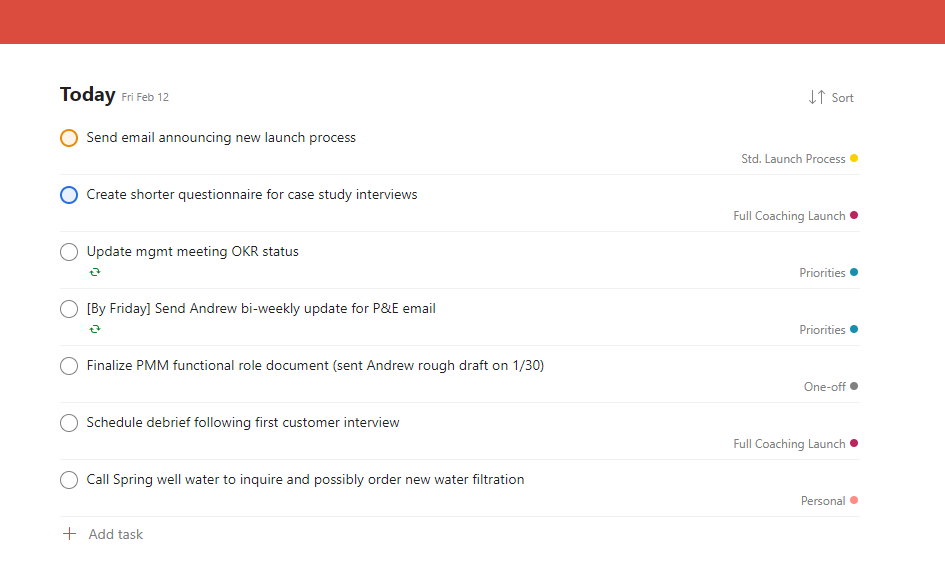
My 'Today' view showing me all the stuff I need to get done across Work and Personal
I'll often start my day by reviewing these items and re-order them if needed. I might want to 1) Start with 1 or 2 easy things to ease in and build some early momentum, and 2) Make sure I do the hard stuff in the morning when I'm fresh.
To see what you have lined up for tomorrow, click 'Upcoming' in the left sidebar. You can also re-order tasks within days and between days from that view as well.
Step 9: End each day with a clean Inbox and clear out your 'Today' tasks
We've already covered how to clean out your Inbox in step 7. At the end of each day, I suggest clearing out your 'Today' tasks as well. You can either mark tasks as complete or reschedule them for another day. Or delete them completely if they're no longer required.
By taking 5 minutes at the end of each day to repeat this step, I can rest assured that I'll be ready to go again tomorrow.
You can take it from here or go further by...
- Setting recurring tasks
- Learning keyboard shortcuts
- Using boards, or
- Explore countless other advanced ways to use Todoist.
Credit for this article goes to the one who introduced me to Todoist years ago, my brother Malcolm.